When connecting Salesforce Marketing Cloud and Salesforce CRM, you have a variety of options for collecting new leads and/or contacts which vary in both complexity and design flexibility. You can "easily" add some options but getting them to look great at the same time is ...uhm.... questionable.
The continuum of options starts with adding a SmartCapture form block and ends with a fully custom CloudPage hosted form and processing page(s). As you move along the continuum, there are several fantastic people and blogs who have provided code to get started OR you could utilize a partner to build out the first iteration and teach you how to replicate it for future forms or events.
You'll also want to be mindful with CloudPage options that the super messages which you contract for are used for page visits, submits, and redirects. The exception to the rule are "code resource" pages that will be referenced in option 4/5.
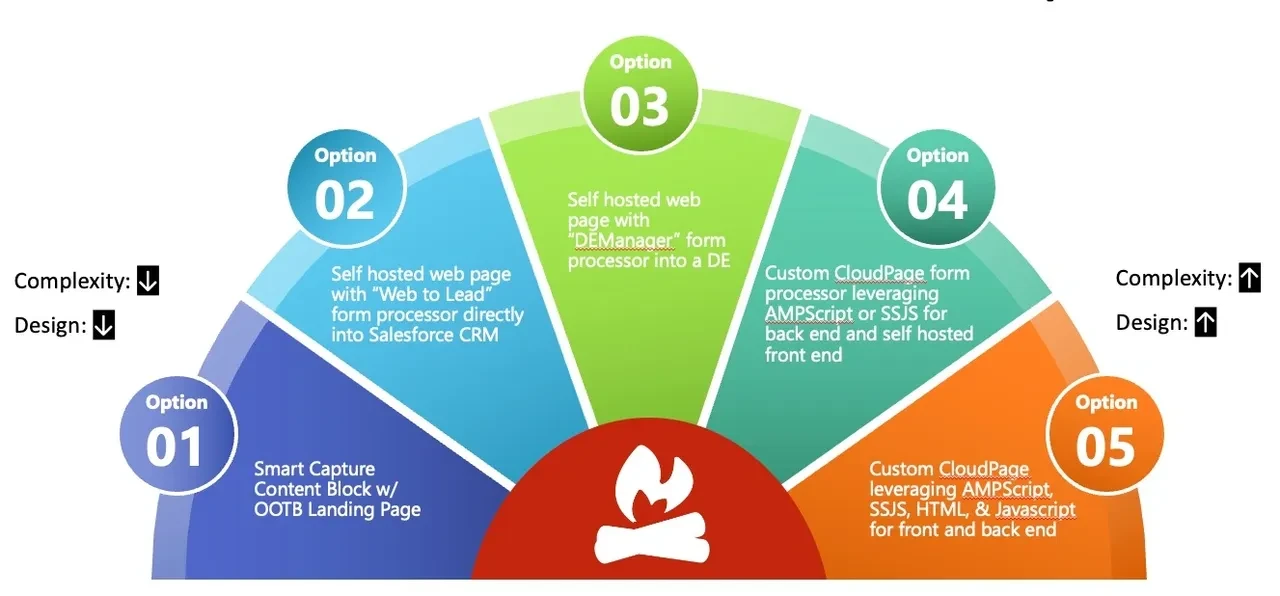
Smart Capture Content Block with Out of the Box Landing Page
With this option, you can create a great looking webpage using Content Builder capabilities and then drag and drop to add a SmartCapture form. The upside is the ease of use in adding it and the initial configuration. Once you bring it into your page, you have options to easily select the Data Extension that you wish to populate, the fields that you want to appear within the form, and specify what content you want to appear for errors and success. You can also easily modify padding, margin, and alignment (to an extent) and there is an HTML editor to modify input field design or to add form validation or other code.
The downsides however are fairly steep. The form will quite frankly look TERRIBLE. At a minimum, you should add Bootstrap code to the base HTML and style the fields. Below is a quick overview of how to add the Bootstrap styling code. Visit getbootstrap.com for the latest code, documentation, and instructions.
You can also edit the styling of the CSS at a broader page level but I've provided instructions for modifying one form field at a time for those that are looking for a quicker/easier solution. It entails adding classes to the label and input.
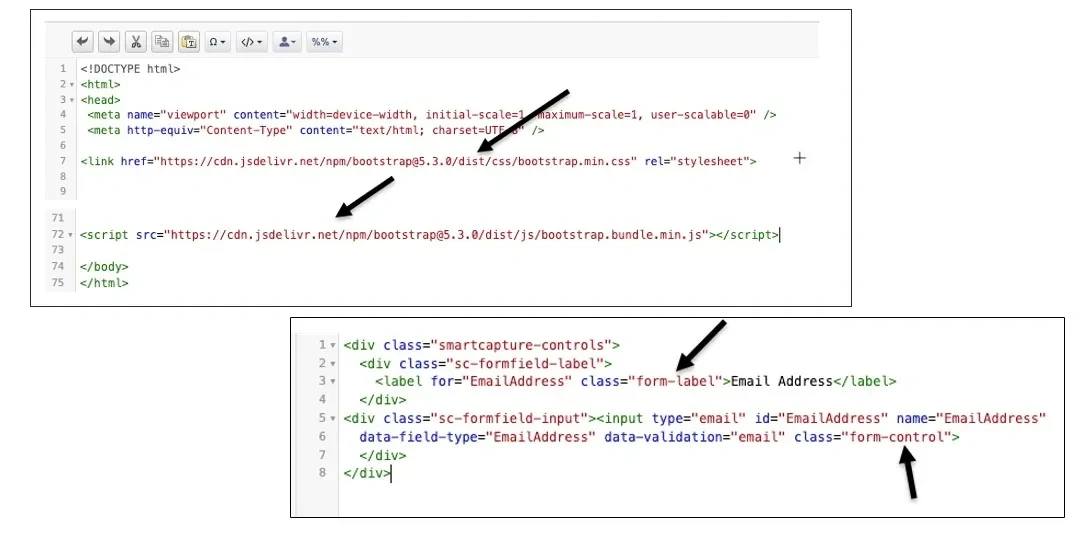
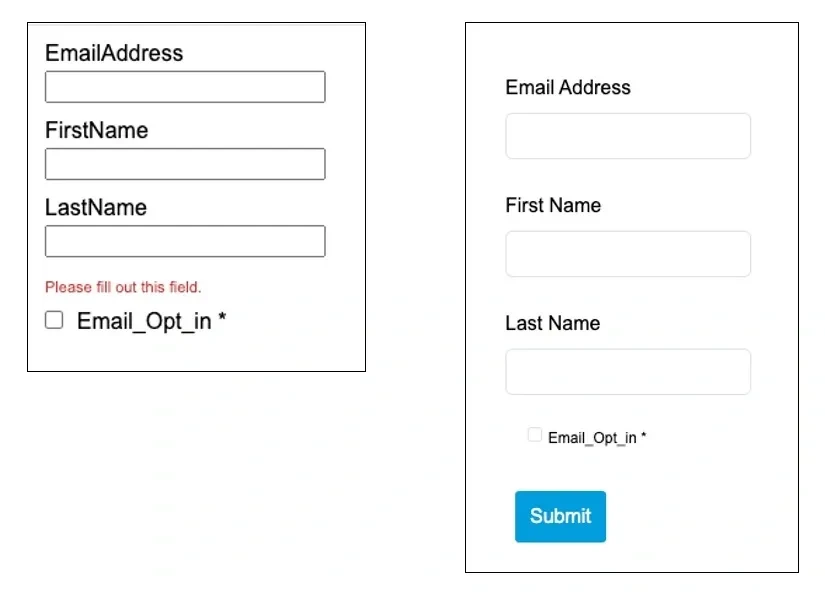
By following the guidance above, you can quickly take your form from the option on the left to the option on the right.
One very important caveat — be sure you have set the desired form fields and names before making any HTML modifications at all within the SmartCapture block. If you go back to the editor and make any changes after modifying anything in the HTML editor, the system will overwrite the modifications that you made to the HTML and this will likely lead to a great deal of cursing. One way around it is to go back into the HTML to edit anything and everything thereafter. Or for those with skills... avoid SmartCapture.
Another important callout is that the SmartCapture functionality does not make it easy to populate CRM out of the box. You can certainly accomplish this with code edits, hidden form fields, and CloudPagesURL() parameters passed through from a form that you linked in an email... but just because it's possible doesn't make it easy. Lucky for you that there are plenty of blogs and partners ready to come to your rescue once again for your first attempt. If you do use a partner, be sure to ask for training in order to build future versions yourself.
Self Hosted Web Page/Form with Salesforce CRM "Web-to-Lead" Functionality
With this option, you can work with your internal designer/developer to build the page of your dreams and then adjust a few elements within the form code that allow creation of a lead in CRM. Note that while this is limited to creating leads, you could utilize Salesforce Flow to handle duplicates and create contacts if a new lead comes through that does not already exist. The good news is that whatever flows have been established for the Lead object in native CRM will still be applied to new leads created from "web-to-lead."
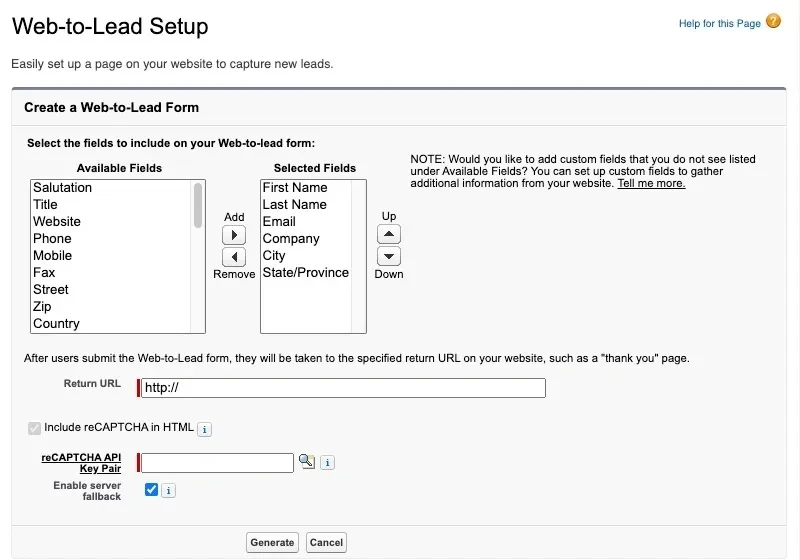
Creating a "web-to-lead" form is fairly simple if you have Admin access. From within "Setup", search for "web-to-lead" within the quick find. Choose "edit" on the original configuration screen to specify an auto response email template if desired. Next, click the button to "Create web-to-lead form" which displays an editor.
Use the editor to specify the fields that you wish to include on the form. You can then select the desired page that the person will be taken to following form submit and can also add reCAPTCHA if you have setup an account previously with Google.
This is the sum of options that you can control. There is no option for the error pages, no automatic de-duplication, etc.
Another VERY important mention is that web-to-lead is designed for lower volume situations. You can create only 500 leads within a 24 hour period unless Salesforce grants you to exceed it for a limited time period. If you exceed that, the information is not lost but it does become more challenging to manage as Salesforce will either email you the info separately that you need to re-enter and/or add them to a queue that has a maximum limit of currently 50,000.
For more about Web-to-Lead, visit these Salesforce help links:
Once you have generated the form code, you can provide it to your developer unless that is your job as well. The code generated is designed to be copy/paste but as you would host the form on your own domain or within CloudPages, you have flexibility to design/style it as needed.
Use DEManager on a Self-Hosted Page or CloudPage
Option 3 is where complexity and thus options further increase. "DEManager" allows you to collect information into a specific Data Extension in Marketing Cloud. Its step-sister "Web Collect" is similar but is designed for creation of a contact in ALL SUBSCRIBERS, publication lists, or suppression lists. We'll save that option for another day.
With "DEManager", you specify your MID, external key of the Data Extension you want to populate, and any success or error page URLs. You also add specific "action" code to your hosted form.
You will have full design and Javascript validation flexibility before items are added to the form. If hosting on a CloudPage, you can use AMPScript or SSJS programmatic languages to add further validation or to add code that could create a lead/contact in CRM, add the lead/contact to a Salesforce campaign at the same time, etc.
DEManager and Web Collect are also good options when working with contacts or leads that already exist in your system in combination/coordination with the CloudPagesURL() AMPScript function. With that function, you can pass parameters through to the CloudPage to align the subscriberkey and then combine it with "DEManager" to track responses in a separate DE or use with "Web Collect" to make updates to ALL SUBSCRIBERS, Publication Lists, etc.
The code example below shows the proper placement of DEManager code within your hosted form/web page. Areas of the code for editing include:
- Specify the stack number
- Specify the MID of your account
- Specify the External Key of the Data Extension
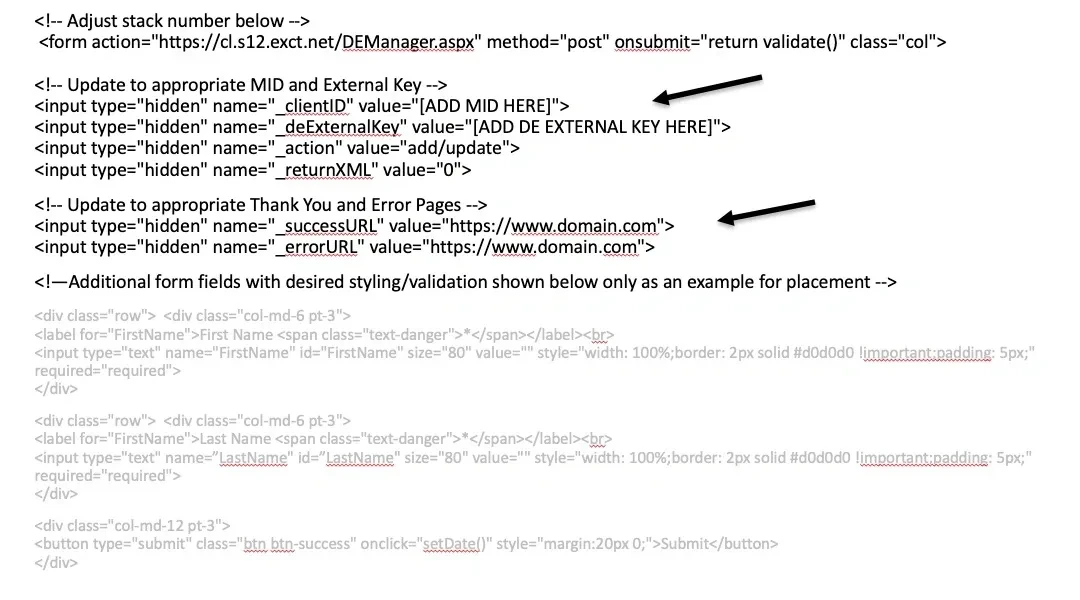
See Salesforce help documentation for more on DEManager as well as to copy paste the latest code illustrated above: DEManager Help Documentation
CloudPage Form Processor Leveraging AMPScript, SSJS, Javascript, etc.
The remaining 2 options are on the high end for complexity and are often completed (or reverse engineered by) someone with savvy coding skills. With Option 4, you create a "code resource" within CloudPages and then add AMPScript, SSJS, etc to process the information that was selected/input into a form hosted elsewhere.
The benefit of using a "code resource" is that you consume zero Super Messages for the processing. You do consume a Super Message if you redirect to a CloudPage hosted page but if your "thank you" and "error" pages are hosted within your main site domain, this can be bypassed as well.
With a "code resource", you can:
- Collect information from a self-hosted/designed form and populate CRM using AMPScript or SSJS
- Leverage JSON for further functionality
- Use logic within the processor to lookup the email address entered to determine if the individual exists already as a lead or contact and handle as desired
- Add submission as a lead, contact, or both. You can also add them to a Campaign.
- Log a copy of the lead into a local data extension if desired using AMPScript
- Add security to limit bot intrusion and malicious intent
- Add logic to send an email or deposit the person into a Journey
Once you publish the code-resource, the url of the page can be applied by adding the url to the form tag. This taps the backend from the front end that is hosted wherever you need it to live.
<form action="https://xxxxxxxxx" method="POST">Custom CloudPage AND Form Processor Leveraging AMPScript, SSJS, HTML, Javascript, etc.
The final option is similar to Option 4 in terms of processing capabilities and might be a 2 page or a single page solution. With this option, you combine the best of both worlds at not only having full control of the design and form validation but also at leveraging features such as pre-populating the form when linking to the form from within an email (using the CloudPagesURL() function), sending an auto response email or putting them in a journey, etc.
Hosted CloudPages also provide a viable option for those users who are limited at publishing content on their main company domain.
Call me crazy/lazy but there are so many others in the community who already provide code and ideas related to using Salesforce Marketing Cloud programmatic languages to populate CRM or Marketing Cloud. They typically provide code examples and more so I would rather honor what they have already made available. Here is a non-comprehensive list of a few that I've found the most helpful (in random order as they are all fantastic). While they point to specific pages, be sure to peruse the remainder of their sites as well!
- sfmarketing.cloud — Lead Capture Form Using AMPScript
- ampscript.xyz — Build HTML Forms Without Smart Capture
- cameronrobert.com.au — Cloud Pages
- mateuszdabrowski.pl — SFMC Code Resource
- digitalmarketingoncloud.com — Securing Cloud Pages with One-Time Password
- sprignaturemoves.com — Updating Salesforce Objects with Server-Side JavaScript
Additional Options
While the spirit of this post is to provide solutions available in standard product (with some additional juice sometimes provided in tandem with a partner or developer), additional options exist when budget or other products are in your arsenal. For example, for those with Data Cloud, form submissions could be sent straight to data cloud using the web SDK and trigger contact update/creation while at the same time benefitting from true profile unification. There are also a variety of 3rd party tools such as Formstack, Form Assembly, or Gravity Forms that enable expanded form functionality, ease of use, and great design for many use cases.
Ultimately the final solution depends upon the ingredients and chefs available to you.
Need Help Building Your Forms?
From SmartCapture to fully custom CloudPage processors, Light Your Fires can help you build the right solution for your use case — and teach you how to replicate it yourself.
Let's Talk