Home/Blog/Salesforce Marketing Cloud
Salesforce Marketing Cloud

Remove Campaign Members from a Journey if Removed from a Campaign

6 min read

While tools and options will exist now or in the near future to make this process easier for customers using Agentforce Marketing, many remain who use existing Marketing Cloud Engagement functionality. All face the challenge of orchestrating Campaign Members out of a current Journey when they are removed from an associated Campaign. Bringing new Campaign Members into a Journey is one of the easiest things to do in Marketing Cloud Engagement but when a Campaign Member is removed from a Campaign, getting them out requires a few extra steps.

Step 1:

Setup a Data Extension to Log Entries

Name the Data Extension as desired as a Sendable Data Extension.
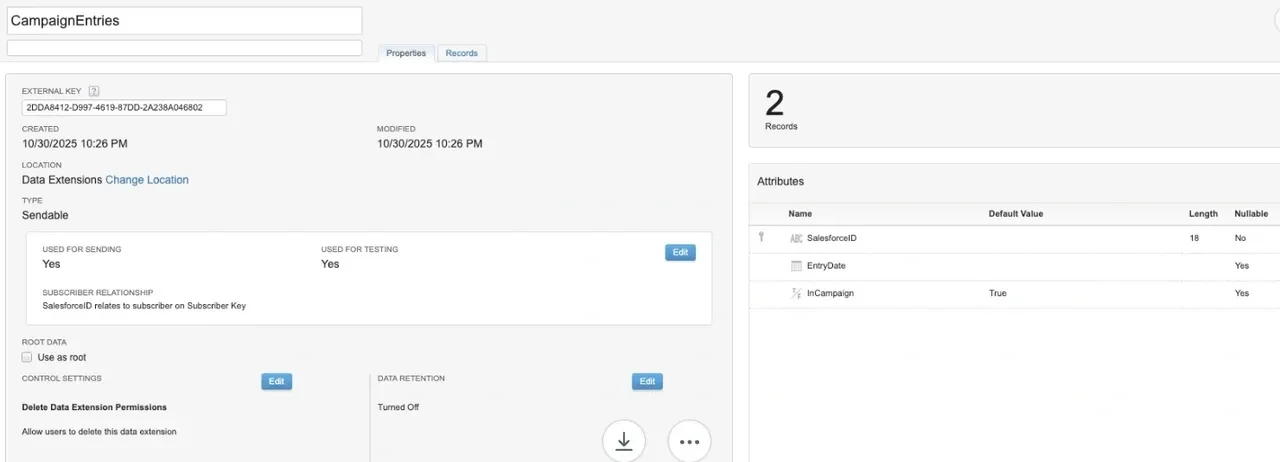
1Create a field for the SalesforceId (since either a LeadId or a ContactId may be inserted into a Campaign). Set it as a Text field allowing 18 characters.
2Create a field for EntryDate with a Date Format. The field should be NULLABLE / Not required.
3Create a Boolean field for InCampaign. Set the default to True. The field should be NULLABLE / Not required.
4Associate the Subscriber Key relationship with the SalesforceId (LeadId or ContactId) used.
CampaignEntries Data Extension setup showing SalesforceId, EntryDate, and InCampaign fields
Step 2:

Create an Attribute Group

1Open Audience Builder > Contact Builder
2Click the Data Designer tab if not already opened
3Click Create Attribute Group from the top right
4Name the Attribute Group as desired
5Click the option to "Link Data Extensions" and navigate to the Journey Log created in Step 1.
6On the right hand side, click Data Extensions and then navigate and select the DE
7Click Contact Key on the left and then SalesforceID on the right.
8As a lead or a contact can exist only once in a campaign, you can keep the default One to One relationship in the top right.
9Click Save
10Click Done if applicable
Step 3:

Add the Update Contact Activity to Your Journey
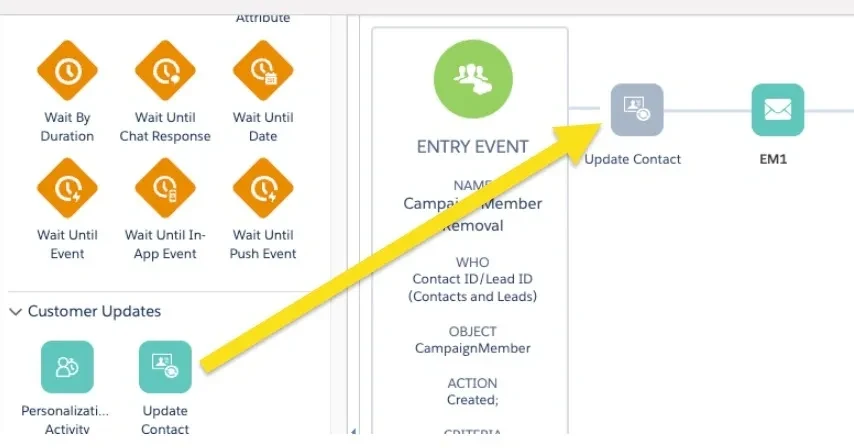
1Drag the "Update Contact" activity from the "Customer Updates" section to the first step in the journey
2Click to Configure it.
3Select the Data Extension that you created in Step One
4Click "Edit" to configure the "Attribute Values"
Journey Builder canvas showing the Update Contact activity placed after the Entry Event
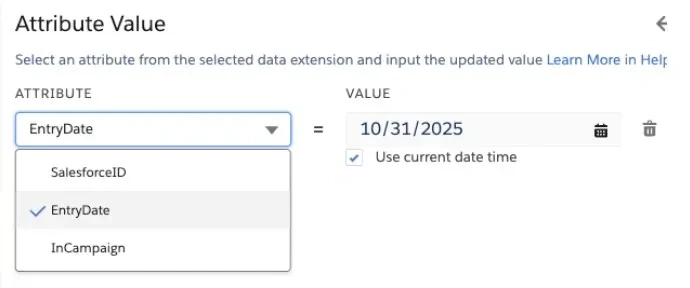
5Choose "EntryDate" for the Attribute and then click the "use current date and time" checkbox.
6Click the Summary button and then the Done button
Attribute Value configuration showing EntryDate selected with Use current date time checked

You should now have a functional journey log which will write a new row in the Data Extension with the Lead or ContactId used for entry into the journey. As either Leads or Contacts may be added to a journey, the LeadId or ContactId will be added to a field named as CampaignMember:Common:Id in the entry data extension. That value is used to set the relationship to SubscriberKey. This is how the SubscriberKey is added to the Journey Log you created in Step One.

Data Extension subscriber relationship showing CampaignMember:Common:Id relates to subscriber on Subscriber Key
Step 4:

Build an Automation to Update the "InCampaign" Value

This is the most complicated part of this process due to the number of steps required:
1Open Automation Studio and click the "Activities" tab in the top navigation.
2Click within the SQL Queries section and add a folder that makes sense.
3Click "Overview" to return to the main Automation Studio screen.
4Click the "New Automation" button in the top right.
5Name the automation similar to how you have named your Campaign if desired but add the words "ExitCriteria" to differentiate it from other automations you may have built for the Campaign.
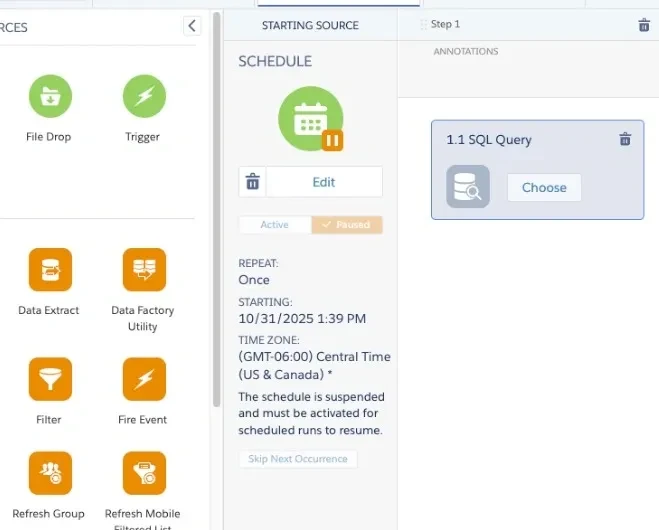
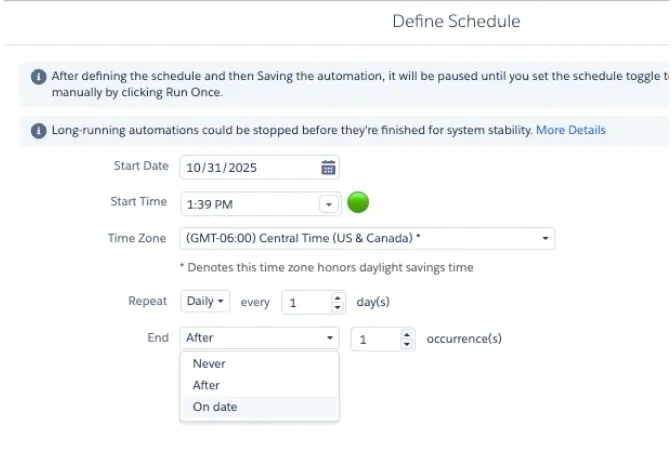
6Drag the Schedule to the Starting Source and set a schedule to run daily. You can also choose the day to stop running the automation.
Define Schedule panel showing daily repeat, start date, timezone, and end options
1Drag the SQL Query option into Step 1 and click Choose to configure it
Automation Studio canvas showing Schedule in Starting Source and SQL Query in Step 1
1Click the button named "Create New Query Activity" in the top right.
2Copy/paste the query below but make 2 updates:
  • Update the FROM to your appropriate Data Extension Journey Log name (that you created in Step 1)
  • Update the CampaignId that is used for your journey. You can locate the id within the Journey Entry Event setup
SELECT ce.SalesforceId, CASE WHEN cm.Id IS NULL THEN 0 ELSE 1 END AS InCampaign 
FROM [YOUR DATA EXTENSION NAME] ce  
LEFT JOIN CampaignMember_Salesforce cm ON ce.SalesforceId = cm.ContactId
    AND cm.CampaignId = 'UPDATE_THE_CAMPAIGN_ID_HERE'
1Navigate to locate the Journey Log DE that you referenced within the Query and built in Step 1
2Choose the Update option.
3Click the Finish button.
4Click Save in the top right and then click Active to activate the automation.
5Close the automation.
Step 5:

Update the Exit Criteria in Your Journey

You can optionally use Exit Criteria or a decision split. If using Exit Criteria, keep in mind that exits will not occur or be evaluated until the end of a wait step.
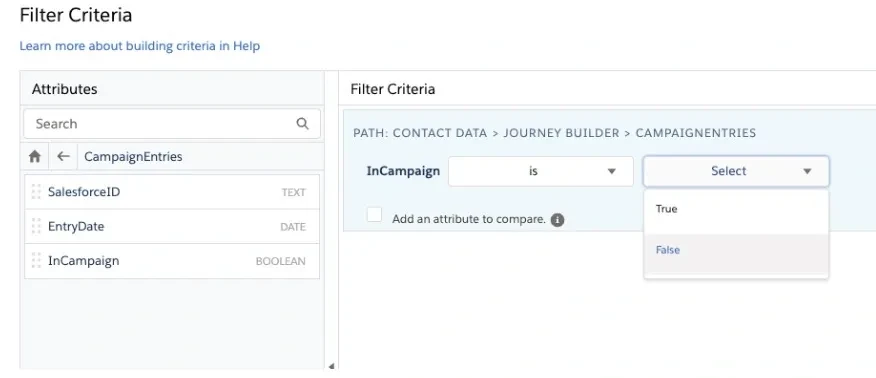
1Click the Filter button
2Choose Contact Data (since data will change over time following entry into the journey).
3Navigate to locate the Attribute Group created and select it
4Drag the InCampaign option to the Canvas
5Set the option to False
Filter Criteria panel showing InCampaign is False selected from the CampaignEntries attribute group
1Click the Done Button
2Click the Summary Button
3Click Done again.
4Save your journey and activate it when desired.

A summary of the steps completed:

  • Created a Data Extension to serve as a Journey Log for all entrants
  • Created an attribute group to connect the log to the Contact Data Model
  • Built and scheduled an Automation to continuously update the log by identifying individuals who are no longer in the Campaign
  • Added Exit Criteria to identify when a record is no longer in a campaign (as indicated by InCampaign = FALSE)

Need Help With Journey Builder Logic?

Complex journey scenarios are our specialty. Whether you're building from scratch or untangling existing logic, Light Your Fires can help you get it right.

Let's Talk